First off, FULL STOP if you do not own BMW Tool 2365377 and 2285574 or it’s ilk, do not attempt this procedure.
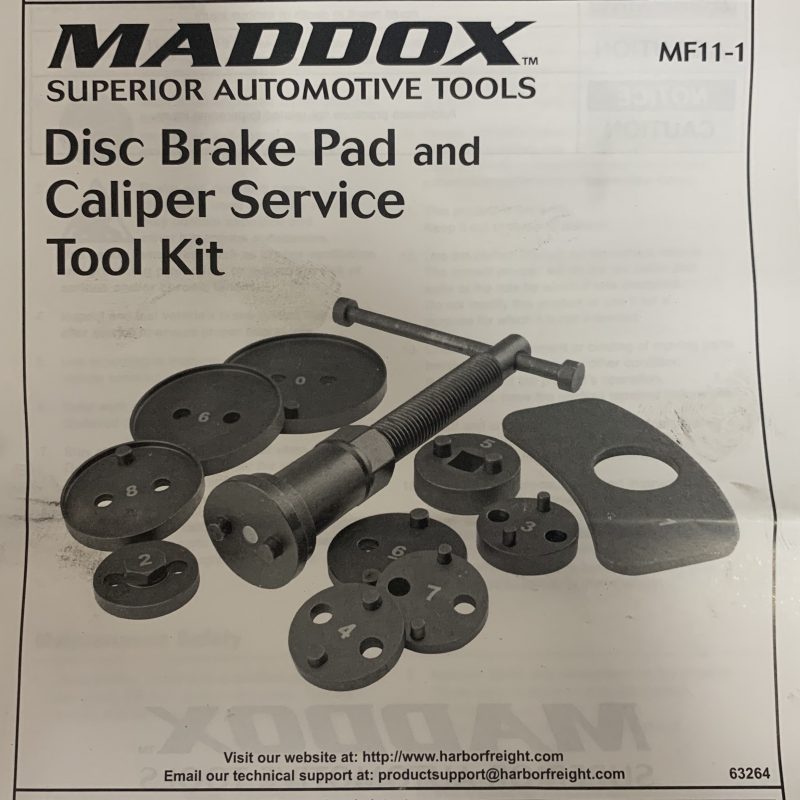
Now, that said, Harbor Freight is a lifesaver and had Maddox 63264, Disc Brake Pad and Caliper Service Tool Kit. See the caliper piston for the rear brakes of a F60 Mini are of the screw type. The only other screw piston calipers I’ve ever seen was on a 1992 Mazda Miata. Without this tool, you’ll be unable to pull the caliper back into place and replace the pads.
For the F60, using this kit, lucky #7 fit the pin setting and worked like a charm.
Okay! Now for all the other tools required to get this job done.
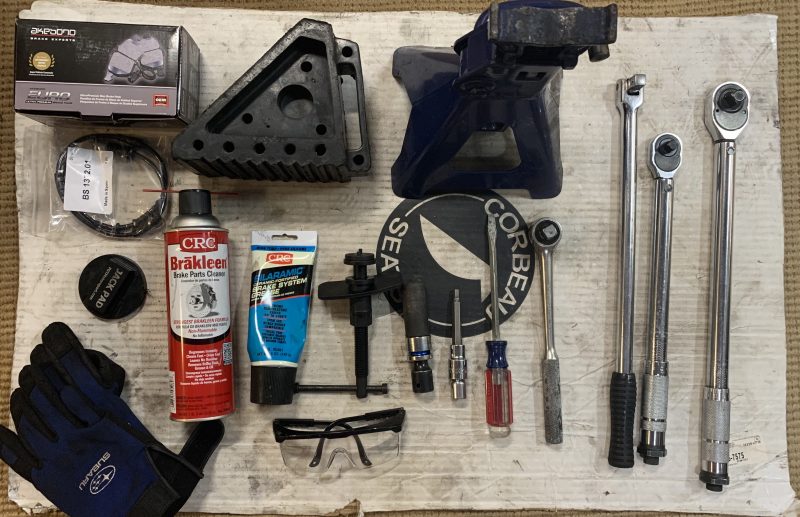
- 1/2″ breaker bar
- 17mm deep socket
- 7mm hex socket
- 1/2″ or 3/4″ ratchet wrench (whatever fits the 7mm socket)
- 3/4″ torque wrench
- 1/2″ torque wrench
- Large flat head screwdriver
- Brake Cleaner
- Paper towels
- Brake grease
- The magical Disc Brake Pad and Caliper Service Tool Kit with lucky #7
- Jack stand
- Jack pad
- Jack
- Wheel chocks
- Work gloves
- Protective eyewear
- Brake pads with new brake pad sensor wire
Torque Settings:
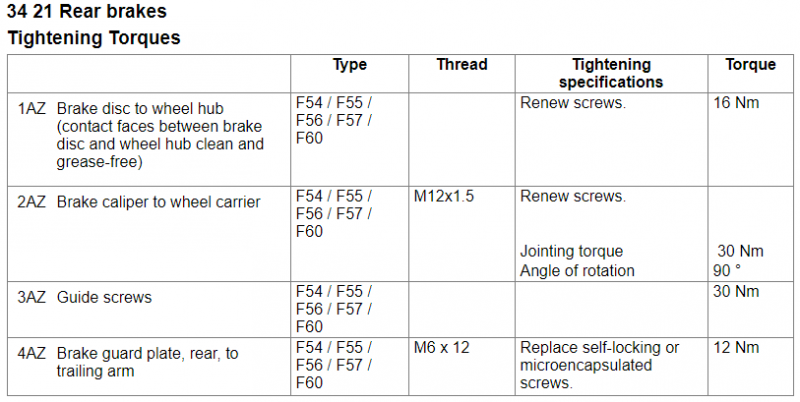
- Caliper guide pins 30Nm = 22ft-lbs
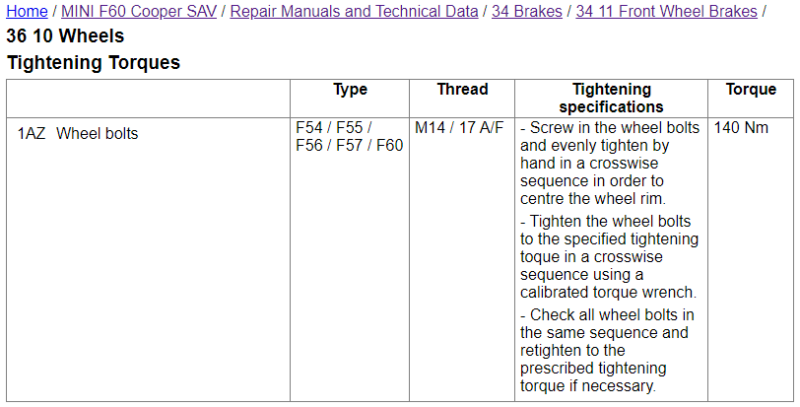
- Wheel lugs 140Nm = 103ft-lbs
CBS Reset Link: https://www.youtube.com/watch?v=9Ru8nkPNszg, thanks buddy.
Begin by heading over to the new TIS and read up. To be honest, this procedure is dead easy. I performed this procedure doing one side and then the other.
First, chock the front wheels and ensure that the parking brake is not engaged. Lightly loosen the lug nuts on the wheel. Then begin by jacking up the car using the jack and jack pad. Once the car is up in the air, remove the wheel keeping order of the lug nuts. I then placed a large piece of cardboard underneath the brake assembly so that I could keep up with parts and keep things clean as this procedure is very dirty.
Remove the retaining spring from the caliper. I use the large screwdriver to press in the center of the spring and against the rotor causing to to pop right off.
Remove the caps to the ends of the guide screws by hand. Using the 7mm hex socket, loosen both guide pins starting with the lower pin. Be gentle with the guide screws as these should come out with ease.
Unplug the parking brake actuator wire by pressing the black tab. This wire is located on the bottom of the caliper. It will slide back and off.
If this caliper has the brake pad sensor wire, disconnect it from the two mounting points along the wire path. Take note of how it is connected and finally, at the end, depress the tab to release the brake pad wire from the body harness. DO NOT pull on the body harness connector.
With the caliper guide pins pulled back and caliper retaining spring removed, jiggle the caliper a bit to free it and then pull it back and rest it on the jack stand so that no wire, cable or brake line is strained.
With the caliper piston tool, screw in the caliper piston using lucky #7. Go slow and ensure that the boot stays in shape and does not pinch or possibly interfere with installation. The caliper should remain balanced on the jack stand and not strain any cable or line. If the piston dust boot gets out of shape, use your hands to lightly press the boot back into the correct shape.
Remove the old pads. If the brake pad sensor is attached, unthread it from the caliper and then remove pad and wire together from the mounting bracket. This brake pad sensor wire will not be reused, ever.
Now for the dirty part. You must clean all the contact points of the brake pad with spray brake cleaner. Make sure you wear eyewear to protect your eyes. I would also wear disposable gloves as this stuff will rot your hands quick. Pay particular attention to the caliper mounting bracket. Review these pictures. OMG, there are so many points of contact to clean. When they are clean, remember to clean the rotor too using the brake cleaner. A toothbrush sized brush would be handy too. That brake dust is really caked on there.
With clean gloves, lube all the contact points with brake grease as well as lightly grease the backplates of the new brake pads. Don’t get the rotors dirty again with grease when applying else clean again with brake cleaner.
Install the new brake pads. Note the top spring on the top of the pad should be fitted to the inboard side of the rotor. It is used to apply pressure to the caliper locking everything into place. Also, if this side of the car has the brake pad sensor wire, go ahead and attach to the pad now.
Reinstall the caliper so that it fits over both pads and that the pads remained locked on their hangers on the caliper mounting bracket. Start with the top guide pin, screwing it in. Then press down on the caliper, engaging the inboard pad spring, align the lower pin with the bracket and carefully start screwing that pin in. Screw both pins in by hand till tight then give it a final torque with the 3/4″ torque wrench of 22ft-lbs. Cover the pins with the caps you removed earlier.
Reinstall the outboard spring. Again, use the flat screwdriver as necessary to flex the spring into place. You’ll know the spring is installed when it will “snap” into place and be flat, pressure spread even.
Reconnect the lower parking brake wire. It will snap into place,
If the parking brake sensor side, reroute the sensor wire and gently installed to the body harness clipping it into place along the path as appropriate.
Remove all tools and position the wheel back onto the brake assembly and rotor taking care for it not to hit the rotor back plate. If that happens, bend it back into place by hand gently. Install the lugs in a crisscross pattern and tighten evenly till hand tight.
Lower the car slowly and remove the jack with jack pad once on the ground. Tighten further the lugs.
Move to the other side and repeat this entire procedure.
Once the procedure is complete on both sides, torque all wheel lugs to 103ft-lbs.
Final step is to press the brake pedal to get pressure back and perform the CBS service, resetting the rear brake pad warning.
Remove the wheel chocks and take for a test drive.
